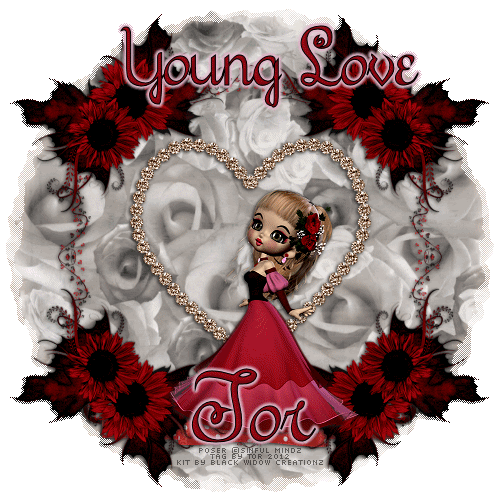
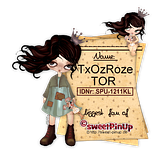
New tut out tonight called Young Love ©Tagz By TOR on January 29, 2012. Featuring a beautiful kit by Black Widow Creations called Death By Chocolate. Thank you Cari for allowing me to work with your beautiful kit!
Click on IMAGE to go to tut.
This tutorial is geared more towards the intermediate to advanced PSP-er.
Please REMEMBER to SAVE often as I don't remind you of this.
Materials Needed:
PSP, I use version 9.01 but any version should work.
Animation Shop (Optional if you want to animate your tag)
Font any fancy kind of font will do, I used Sachiko which is a FTU font and can be found HERE
Kit: Death By Chocolate by Black Widow Creationz this is a PTU kit and can be purchased HERE
Plugins:
Gradient Glow
Bright Noise
Newspaper Mask By Cat HERE in the Mask 2 section to download
Ok....let's tag!
The materials I used for this tag:
Paper53
Ribbon9
Frame10
Doodle1
Flower4
sm_melanieVD4_2
Open New Image 1000x1000 (I like to have working room, we will resize later). Rename the layer showing as Canvas, flood fill with white. New Raster layer, rename Background 1, flood fill with white. New Raster layer, rename Background 2, Ctrl+A (select all). Open your Paper53, Ctrl+C (copy). Back to your image, Ctrl+Shift+L (paste into selection), Ctrl+D.
Go to your Layers toolbar, New Mask Layer, from image. Find the mask layer named NewspaperMaskCatInsatiableDreams, use these settings: Create mask from: Mark Source luminance, click Ok. Now your Paper should be showing with the mask applied. Go to Layers-Merge Group. Repeat same steps with the Background 1 white layer. Be sure you Merge your groups each time! Now highlight Background 2 layer, set the Blend Mode to Luminance (Legacy) and Merge-Merge Down into Background 1 layer.
Next, Minimize your tag image and open your Doodle image, Ctrl+C and Ctrl+V (We are working now in a new image). Shift+S to resize tube by 60% two times. Image - Rotate, Left 90 degrees. Move to the right side of your canvas. Duplicate Image, Image Mirror. Move the pieces together until the hearts at the ends of each line up and a small circle is now formed in the center of the two pieces. (See Figure A).

Figure A
Layers Merge Down. Duplicate, Image - Flip. Duplicate, Image - Rotate Left 90 Degrees. Duplicate, Image - Mirror. Now line up the ends where they overlap each other to form a frame. (See Figure B).
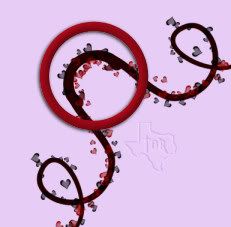
Figure B
Hide Raster Layer 1, Merge - Merge Visible. Highlight, Right Click, Cut, Paste as a New Layer on your Tag image. Rename this layer as Doodle Frame.
Next, open up Frame10. Ctrl+C, back to your tag image. Ctrl+L. Duplicate this layer two times, and rename each layer as Heart 1, Heart 2, and Heart 3.
Open up Flower4. Ctrl+C, back to your tag image, Ctrl+L. Move to your corner of your doodle frame. Image - Rotate Left 20%, click OK. Duplicate, Mirror, Duplicate, Flip, Duplicate, Mirror. Merge ONLY the flower layers down into themselves, and rename the final on as Flower Corners.
Open Ribbon9. Ctrl+C, back to tag image, Ctrl+L, rename Ribbon. Move ribbon into place between the bottom two flower corners, adjust sharpness, sharpen. Drag this layer (in your layer palette UNDER the flower corners layer.
Open sm_melanieVD4_2. Ctrl+C, back to tag, Ctrl+L, rename Tube. Place tube on top of the ribbon (where she looks like she is standing ON the ribbon).
Ok once everything is in place, Resize by 50%. Now you will need to adjust sharpness - sharpen on the following layers...Tube, flower corners, doodle frame, heart 1, heart 2, and heart 3 layers.
Highlight Heart 1 layer, use your DSB Flux, bright noise set to 50% and Mix, be sure you click on Mix 1 time. Highlight Heart 2, repeat, but this time click on Mix two times. Repeat with Heart 3, clicking on Mix three times.
Give the following layers a dropshadow: Tube, Flower Corners, Ribbon, Doodle Frame, Heart 1, Heart 2, and Heart 3. With the following settings: V:1, H: -1, O:100, B: 5 and Color: Black.
***Please Note*** If you don't want to Animate, you can stop here. DELETE your Heart 2 and 3 layers and your canvas layer, add your copyright info. Text to your tag and Merge-Merge Visible your layers, Save as a template for later use. Add your name on the tag on a different Raster Layer (so you can also make tags for others on new layers), and save your new tag, you are done.
***Text ***I used Sachiko at a size 60, stroke: 1.0 and colors used: Forground set to Black (#000000) and Background set to Red (#930916).
Then I used Gradient Glow with these settings: On the Settings Tab, scroll down until you see Subtle White Glow, click on that. Go to your Basic Tab and adjust these settings: Glow Type: Both. Mask Selection box is checkmarked. Now down towards the bottom you will see some paint can, on top a black one, on the bottom a white one. Click on the white paint can. Now you should see a color box activated, click on the color box displaying the color white. Now a color diagram box opens and allows you to choose a color. Color I used for the glow is a pink color (#e1bacc). List that color in the HTML box and click OK.
Now in your preview window you should see your text glow in pink. Ok back to the top section of your Basic tab, make sure your settings are as mine are below: Glow Radius: 5, Soften Corners: 35, Overall Opacity: 100, Distortion Amount: 0, Distortion Lump Size: 100, and Gradient Smoothness: 100. Random Seed: 1, Click OK at the top right hand side of your box.
Give your text a dropshadow as before: V: 1, H: -1, O: 100, B: 5 and Color: Black (#000000). Click OK.
*** For those who do prefer the Animated look, continue on this way ***
Add a New raster layer, make sure it is the uppermost layer in your layer palette. Name this layer Copyright Info. Add your copyright info, here I did mine with a very small font, at a size 6 with my anti-alias set to OFF. Placed it underneath my ribbon on my tag and lowered the Opacity down to 50%. Added my taggers info the same way on a new raster layer named the same.
Once you have done all of that, we are now ready to Animate. Open up Animation Shop.
Back to PSP. Hide Heart layers 2 and 3.
You can now DELETE your Canvas Layer as we won't be needing this layer any longer. Make sure you highlight any layer name besides Heart 2 and 3 for this next part.
Right click on the top of your image tag, Copy Merged. Back to A/S....paste as a new Animation. Back to PSP. Hide Heart 1 layer. Unhide Heart 2 layer. Copy Merged, back to A/S, paste AFTER current frame. Back to PSP. Hide Heart 2 layer. Unhide Heart 3 layer. Copy Merged, back to A/S, paste AFTER current frame.
Back to A/S. Click on Frame 1. Go to Edit, Select All. All of your frames should now be highlighted with a blue outlined box around them. Shift+Z (Optimization Wizard dialog box opens). These are the settings I have used for my animated tag. See Figures C, D, E and F below.
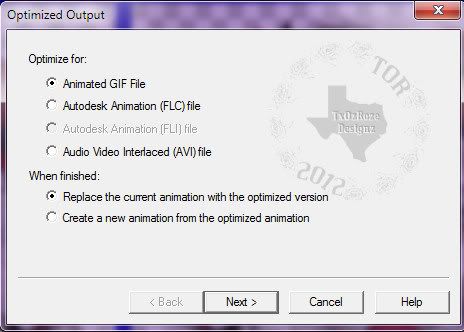
Figure C
Clicking next after Figure C. You will need to click on the Customize button. Now, you can follow along with Figures D, E, and F for the appropriate tabs.
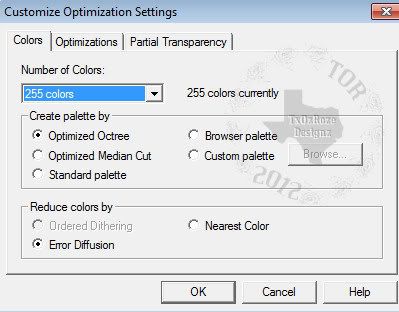
Figure D
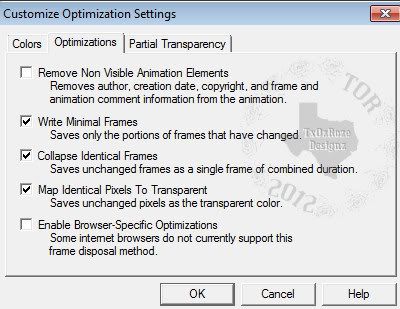
Figure E
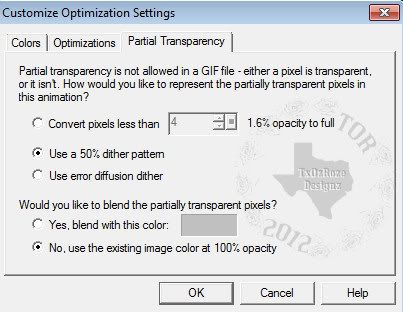
Figure F
Once you have settings as in Figure F, Click Ok, Click next, click next, you will now see your Optimized Preview. Click next, click finish. In your A/S tool bar, click on View Animation. Save your file and you are done!
I hope you have enjoyed this tutorial, should you have any difficulties, please feel free to email me at TagsByTOR@gmail.com with YOUNG LOVE in the subject line.


No comments:
Post a Comment