New tutorial written by TOR on January 19th, 2012.
This tutorial features a fabulous template by Divine Intentionz,
and a fabulous kit called Hearts Emotions by Nette's NightOwl Works.
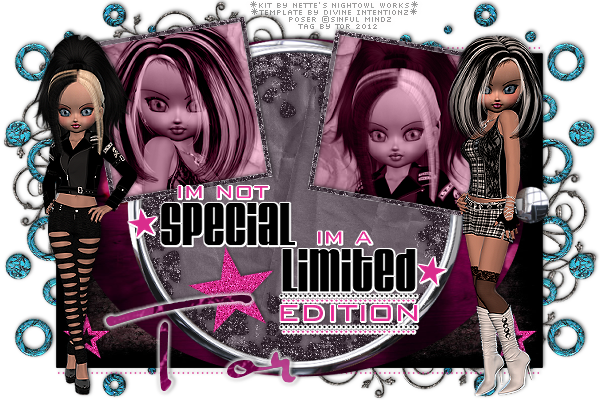
Click IMAGE to go to the tut.
Materials Needed:
PSP, I use version 9.01 but this should be able to be done in any version with slight modifications.
PSP, I use version 9.01 but this should be able to be done in any version with slight modifications.
Scrapkit: I used Hearts Emotions that is a PTU kit by Nette's NightOwl Works and can be purchased HERE
Template: Here I used a template from Divine Intentionz, template #381
Font of choice for name personalization. I used Satisfaction
Plugins:
Mura's Meister - Copies
Eyecandy 5 Impact - Gradient Glow
Mura's Meister - Copies
Eyecandy 5 Impact - Gradient Glow
Let's tag!
Elements from the kit that I used:
nnw emo paper1
nnw emo paper5
nnw emo paper6
nnw emo paper9
nnw emo paper10
nnw emo paper1
nnw emo paper5
nnw emo paper6
nnw emo paper9
nnw emo paper10
sm_CGUmaverick2_1
sm_CGUmaverick2_3
sm_CGUblkpoison2_3
sm_CGUmaverick2_3
sm_CGUblkpoison2_3
OK here we go!
Open template, Shift+D, close original. Image resize 80% all layers checked marked. Click OK.
On your layer palette, highlight the background layer, Image, resize CANVAS to 600x400 pixels / placement center. Click OK. Back to your background layer, flood fill with White. New raster layer, name it bg 2 and flood fill with a light (pastel) color of choice. New raster layer, name it bg 3 and flood fill with a dark color. (This is so we can check copyright info against different colored backgrounds for our finished tag).
On your layer palette, highlight the background layer, Image, resize CANVAS to 600x400 pixels / placement center. Click OK. Back to your background layer, flood fill with White. New raster layer, name it bg 2 and flood fill with a light (pastel) color of choice. New raster layer, name it bg 3 and flood fill with a dark color. (This is so we can check copyright info against different colored backgrounds for our finished tag).
Highlight Raster 1 layer in your layer palette (this would be your templates copyright info). Delete this layer.
Highlight the top chrome brad layer, layers merge, merge down. Highlight star2 layer, layers merge, merge down. Highlight Copy of Raster 2 Shadow 1 and delete. Do the same for Raster 2 shadow 2 layer. Highlight Copy of Raster 2, layers merge, merge down.
Copy nnw emo paper1. Highlight the Rectangle layer in the layer palette. Select all, float/defloat, paste into selection. Ctrl+D. Dropshadow with the following: -1,1,55,5,black. Click OK.
Copy nnw emo paper5. Highlight the Oval layer. Select all, float/defloat, new raster layer, paste into selection. Ctrl+D. Delete the Oval layer. Dropshadow as before with the same settings.
Copy nnw emo paper10. Highlight the Circle layer. Select all, float/defloat, new raster layer, paste into selection. Ctrl+D. Delete the Circle layer. Dropshadow as before same settings.
Give your Chrome circle, Raster 2, Star, Star 1 and Chrome Brad layers a dropshadow with settings used earlier.
Copy nnw emo paper6. Highlight the frame back layer, paste as a new layer. Selections invert, hit delete key twice. Ctrl+D. Do the same for the other frame back layer.
Copy nnw emo paper10. Highlight frame 1 layer. Selections, select all, float/defloat, paste into selection. Ctrl+D. Dropshadow with settings supplied earlier. Repeat with frame 2 layer.
Now highlight your Raster 6 layer. It should be the layer above the first frame back layer as you look down from the top of your layer palette. Selection / select all, float/defloat. Open sm_CGUblkpoison2_3. Shift+D, close original. Resize 80% x2 times. Copy, Minimize your tube and Paste as a new layer onto your tag. With your mover tool, move your tube into place inside your frame, Selections / invert, hit delete key twice. Ctrl+D. Dropshadow as before. Set blend mode to Luminance(L).
Highlight your Raster 5 layer. Open sm_CGUmaverick2_1. Shift+D, close original. Resize 80% x2 times. Copy, Minimize your tube and Paste as a new layer onto your tag.. With mover tool, move tube into place under the frame on the right side, selections / invert, hit delete key twice. Ctrl+D. Dropshadow as before. Set blend mode to Luminance(L).
Now hide all of your background layers (background, bg 2 and bg 3) Merge, merge visible.
Open nnw emo swirl. Copy/Paste as a new layer. Resize by 80% x6 times. Effects, plugins, Mura's Meister - Copies. Set to default settings and in the pull down menu set to Encircle. Click OK. Resize by 80%. Name this layer Swirl. Move the swirl up towards the top left of your tag. Duplicate this later and Mirror, Flip. Copy of Raster 1 layer, Merge, merge down. Right click on Raster 1 layer in layers palette, drag under your tag. Add dropshadow same settings used earlier.
Open nnw emo doodlieos2. Copy/Paste as a new layer. Make this layer the very top layer in your layer palette. Resize 80% x6 times. Move it to the top right corner of your tag. Duplicate, Image flip. Duplicate, image mirror, duplicate, image flip. Layers merge, merge down x3 times. Dropshadow as before. Name this layer Doodles. Drag this layer under your tag layer and above the Swirl layer.
Now maximize both your tubes from earlier. Resize each by 80% x2 times and paste each as a new layer onto your tag (see my tag for placement). Sharpen and give them both a dropshadow using the same settings as earlier. Layers, merge, merge visible.
New raster layer and add your copyright info / tagger info. I do this with black and add Gradient glow to this so it will show up in both light and dark backgrounds. Be sure you can see them against your 3 backgrounds you made earlier. If all is well. Delete all three background layers and Merge Visible your tag layers and save as a .png file. Then you can use it as a template when personalizing tags later on. I used Satisfaction with nnw emo paper9 as my background fill for names, then applied the gradient glow and dropshadow. Once you add names you are done! YAY!
If you should have any troubles with this tutorial, please feel free to email me at TagsByTOR@gmail.com
with a subject line of LIMITED so I don't miss your email.
Thanks for trying out my tutorial! Hope you have enjoyed it!
*Hugz*
TOR


No comments:
Post a Comment