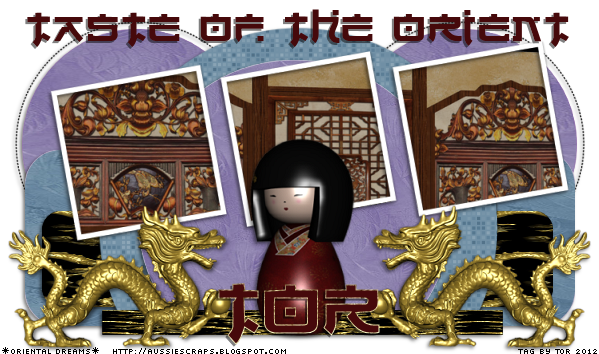
Click IMAGE above for tutorial.
New tutorial ©TOR on January 5, 2012.
This tag tutorial is of my own creation and any other similar to it is purely coincidental.
Please DO NOT upload this tutorial to another website / blog OR share via email OR thru online groups. I do welcome inquiries if others would like to use my tutorials, but please send them here to my blog or share a link to this particular tutorial page on my blog.
*Thank You*
Materials Needed:
*PSP, I use PSP v9.01 but this should be able to be done in any version.
*Scrap kit called Oriental Dreams that is a tagger sized kit and PTU by Aussie Scrap Designs, and you can purchase this kit HERE. Thank You, Gail for a beautiful kit to work with!
*Template #429 by Divine Intentionz and you can find it HERE
Font I used here is called Hirosh it is a FTU font, you can of course find it HERE
NOTE: This is assuming you have the working knowledge of PSP, I am going through the steps
I used to make this tag. I use "short-cut" keys most of the times when writing my tutorials
versus listing the actual tabs and the route these tabs take to get the job done *smiles*
Please remember to SAVE often....I won't be reminding you throughout the tutorial about
this important step. Seasoned PSP-ers know the reason for this, many a times PSP may encounter
freezing, and automatically closing down of the program on its own and all would then be lost.
So SAVE often! *smiles*
Ok, let's get to taggin'!
open template #429 ,Shift+D close out original template.
Shift+S 80%,all layers check marked, click OK.
On your template, Highlight dotted circle 2 right click merge, merge down.
Highlight circle 3, right click, merge, merge down.
Highlight rounded edge rect 2, right click, merge, merge down.
Highlight rounded edge rect 4, right click, merge, merge down.
Delete layers word art back, word art, raster 2.
open bgpaper5, copy and close original. Back to your template.
Highlight your circle 4 in your layer pallette.
Ctrl +A (select all), Ctrl+F (float), Ctrl+Shift+F (defloat), Ctrl+Shift+L (paste into selection),
Ctrl+D (select none). Effect, 3D effects, Dropshadow with these
settings: V=2, H= -2, O=50, B=5, color=Black (#000000). Click ok.
open bgpaper2, copy and close original. Back to template.
Highlight rounded edge rect. Ctrl+A, Ctrl+F, Ctrl+Shift+F,
Ctrl+Shift+L, Ctrl+D. Dropshadow same above.
open bgpaper1, copy and close original. Back to template.
Highlight rounded edge rect3. Ctrl+A, Ctrl+F, Ctrl+Shift+F,
Ctrl+Shift+L, Ctrl+D. Dropshadow same above.
Highlight circle1. Adjust, Hue & Saturation,
Colorize with these settings: H=145, S=60, click ok.
Dropshadow same as above.
Highlight circle2. Reopen bgpaper5, copy and close original.
Back to your template. Ctrl+A, Ctrl+F, Ctrl+Shift+F, Ctrl+Shift+L, Ctrl+D.
Dropshadow same above.
Open Japanese_Wall, copy and close original.
Highlight frame backs. Ctrl+A, Ctrl+F, Ctrl+Shift+F,
paste as a new layer, resize 80%, all layers unchecked. Click ok.
Shift+Ctrl+I (invert), tap Delete key twice. Ctrl+D. Highlight
Raster 2, right click, merge, merge down.
Highlight frames layer. Dropshadow same as earlier. Click ok.
reopen bgpaper1, copy, close original.
Back to template. Highlight Raster 4. Ctrl+A, Ctrl+F, Ctrl+Shift+F,
Ctrl+Shift+L, Ctrl+D. Dropshadow same above.
open golden_dragon_small. Copy and close original.
Back to template. Paste as a new raster layer.
Shift+S 80%, all layers unchecked.
Move in place to right side of template (see my tag for placement),
adjust sharpness, sharpen. Dropshadow as before.
Right click Raster layer 2, duplicate. Ctrl+M (mirror).
Layers, merge, merge down.
Open Japanese_Doll. Copy, close original,
back to template, paste as a new layer. Shift+S 4 times. Adjust sharpness,
sharpen and add dropshadow as before.
Now finishing touches...highlight dotted circle 1 dropshadow as before.
Delete Raster layer 1 (white background).
Layers, merge, merge visible. At this point if tag is too large for you,
you can resize the tag BEFORE adding the
copyright info and names onto the tag.
Be sure to adjust sharpness and sharpen.
IF you are NOT resizing your tag,
progress to the next step.
Add your copyright info, save as a .png file for later use to add
more names to later and you are done!
Hope you have enjoyed this tutorial *smiles*.
Any questions, please feel free to email me at TagsByTOR@Gmail.com
with a subject of Tag Tut: Taste of the Orient, so I will see it and it won't get
lost amongst my other pieces of mail and I can get back to you more quickly.
*Hugz*
TxOzRoze aka TOR
Any questions, please feel free to email me at TagsByTOR@Gmail.com
with a subject of Tag Tut: Taste of the Orient, so I will see it and it won't get
lost amongst my other pieces of mail and I can get back to you more quickly.
*Hugz*
TxOzRoze aka TOR


No comments:
Post a Comment