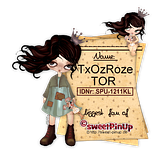
New tut called Your Toxic Love,
written by ©TOR, January 31, 2012.
written by ©TOR, January 31, 2012.
Had some internet problems so this is only now getting uploaded today. This tutorial features the beautiful poser art of ©JustSan aka Sandra from MTA. And also features a beautiful kit by Sleek n Sassy Designz aka Jen, called Shot Through the Heart. Thank you to both Sandra and to Jen for use of your beautiful artworks.
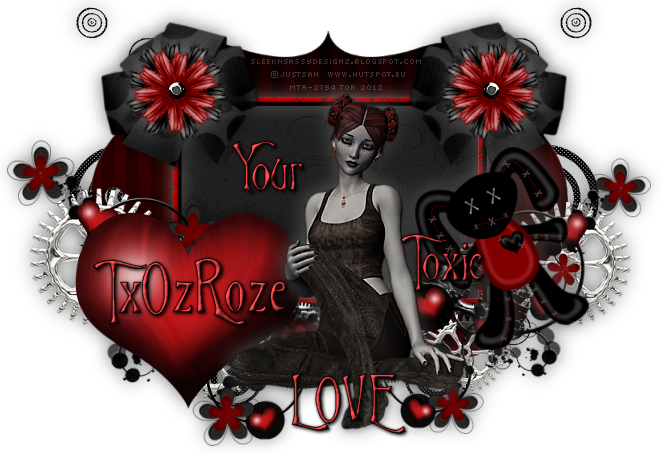
Click on the IMAGE above to go to the tut.
This tutorial was written January 31, 2012 and is ©TOR. This tutorial was written for those who have basic knowledge of PSP. This tutorial was written in psp 9.01 but can work in other versions.
Materials needed:
Tube of choice, I am using a licensed tube by ©JustSan called Pandora, you will need a license to use JustSan's work, and can be purchsed here at My Tubed Art.Scrapkit: Shot Through the Heart is a PTU scrapkit by Sleek n Sassy Designz and can be purchased at Scrappin Dollars.
Font of choice, here I used PS Bluegum Forest which is a FTU font you can get HERE
Tag Template #22 by Missy at Divine Intentionz
Let's tag!!
Materials I used from the kit:Paper3
Paper4
Paper5
Doodles (resized 50%)
Steampunk (resized 80%)
Steampunk3 (resized 80%)
Voodoo_Bunny (resized 80% x 3 times)
Bow6 (resized 80% x 5 times)
Flower (resized 65% x 3 times)
*PLEASE NOTE* I DO use shortcut keys and I DON'T remind you to SAVE throughout the tutorial.
First, open your tag template in PSP. Ctrl+C, Ctrl+V, close the original out. In your layer palette delete the by Missy layer.
Next Shift+S to resize your template to 500 pixel width (the height will automatically resize). Highlight your Background layer, we are going to create a little working room to create in now. Once the background layer is highlighted, Click on Image, Canvas size, set your width to 800 pixels width by 600 pixels height. Make sure the placement is set to Center, click OK. Now flood fill the rest of the background with White (#FFFFFF).
Next, Hide the Frame and Frame Background layers. Open paper of choice, here I used Paper5 from the kit. Copy, close out the original. Highlight the Shape layer in your layer palette. Ctrl+A, Ctrl+F, Ctrl+Shift+F, Ctrl+Shift+L, Ctrl+D.
Next, Unhide your Frame Background layer. Open a second paper of choice, here I used Paper4 from the kit. Copy, and close out the original. Ctrl+A, Ctrl+F, Ctrl+Shift+F, Ctrl+Shift+L, Ctrl+D. Now to give this layer a little dropshadow. Now depending on your Shapes paper color, you may have to adjust your Dropshadow color. Effects--3D Effects--Dropshadow with these settings: V: 1, H: -1, O: 50, B: 25, Color: Grey (#ACA9A7).
Unhide your Frame layer. Open a third paper of choice, here I chose Paper3 from the kit. Copy and close out the original. Ctrl+A, Ctrl+F, Ctrl+Shift+F, Ctrl+Shift+L and Ctrl+D. Effects -- Inner Bevel. Here I used these settings: Bevel: 2, Width: 15, Smoothness: 0, Depth: 10, Ambience: -3, Shininess: 0, Color: White (#FFFFFF), Angle: 315, Intensity: 50, Elevation: 30. Click Ok. Dropshadow as before BUT change the Opacity to 50, click Ok.
Add your tube of choice on a new Raster layer. Rename this layer as Tube. Resize as needed and place in the center of your tag, giving it a little dropshadow as well. Here I used the same dropshadow settings with the exception of the Vertical / Horizontal I changed both of these to -1, Click Ok.
Now let's decorate the tag with a few elements. Here I used Doodles from the kit. Copy, close original out. New Raster layer, rename it to the element you are using, so mine I named Doodles. Ctrl+E, Ctrl+D. Now to resize...Shift+S. Here for this particular one I resized by 50%. Move into place on your tag to your liking. Right click on your element in the layer palette, Image -- Duplicate. Image -- Mirror. If it is to your liking, Layers -- Merge -- Merge Down. Now drag this layer UNDER your Shape layer in the layer palette. Continue with adding a dropshadow to each of the elements you choose to use for your tag.
Once you are done adding elements to your tag. Delete the Background layer in your layer palette. Crop your tag down. Layers -- Merge -- Merge Visible. Now add your copyright info and your tagger info. Merge -- Merge Visible. Save as your tag template to personalize with names or to make extra share tags with, adding names to separate raster layers, save a .pspfile.
Font used for names is PS Bluegum Forest, you will have to adjust the font size according to name's length. Short names I used a size 60 and longer names I went as far as using a size 48. With a stroke of 1. Foreground Color: Black (#000000), Background Color: Red (#C1363A), Gave names an Inner Bevel with these settings: Bevel: 2, Width: 15, Smoothness: 0, Depth: 10, Ambience: -3, Shininess: 0, Color: White (#FFFFFF), Angle: 315, Intensity: 50, Elevation: 30. Then a dropshadow with these settings: V / H: 1, O: 100, B: 5, Color: Black (#000000).
Save each tag as a .png file. You are done!! YAY!!
Hope you have enjoyed this tutorial, if you should run into any problems, please feel free to email me at TagsByTOR@gmail.com with TOXIC in the subject line so I do not miss your email.
If you would like to mail me your results, I would LOVE to see them, please mail at the above address with same subject line.
*hugz*
TOR


No comments:
Post a Comment